
Dynamic AI-Assisted WordPress Landing Pages: Building Personalization in Elementor Pro
The average landing page still treats every visitor exactly the same. Someone arriving from a Google Ads campaign about “enterprise WordPress development” sees the same headline as someone who clicked a Facebook ad about “affordable website design,” even though those two visitors want completely different things from the page. That mismatch is one of the quieter reasons conversion rates stall even when traffic looks healthy.
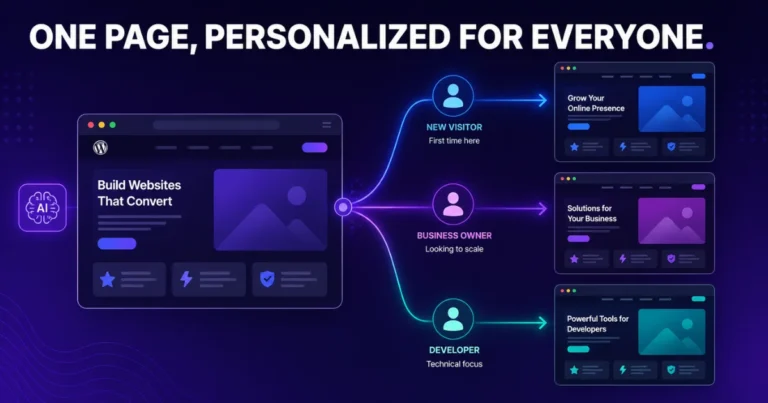
Personalized, dynamic landing pages fix this by adjusting what a visitor sees based on who they are, where they came from, or what they’ve done before — without you building a separate page for every audience segment. In this guide, we’ll cover how to build dynamic personalized landing pages in Elementor Pro, using its native display conditions and dynamic content features, plus where AI tools fit into speeding up the content variations you’ll need.
This is a workflow our team at Dynamic Tech World has been building into client landing pages for exactly the reason above — a single well-built dynamic page consistently outperforms three or four static variants that all have to be maintained separately.
Table of Contents
What “Dynamic” Actually Means Here
There are two layers to a dynamic landing page, and it’s worth separating them clearly before building anything:
- Dynamic content — pulling in data automatically instead of hardcoding it. A price pulled from a custom field, a testimonial pulled from a CPT, a countdown timer, the visitor’s current date. Elementor’s Dynamic Tags handle this layer.
- Conditional personalization — showing or hiding entire sections, or swapping content, based on who’s viewing the page. A different headline for paid traffic versus organic. A different offer for returning visitors versus first-time ones. Elementor’s Display Conditions, combined with a visibility addon for the more advanced conditions, handle this layer.
A truly dynamic landing page combines both: the structure adapts to the visitor, and the content inside that structure pulls live data rather than staying static.
Step 1: Map Out Your Visitor Segments Before Building Anything
Before opening Elementor, decide which segments actually justify a different experience. Common, high-value segments for a service business include:
- Traffic source — Google Ads vs. organic search vs. social vs. direct
- URL parameter / campaign — different ad groups pointing to the same page with different utm_content or custom query parameters
- Returning vs. new visitor
- Logged-in vs. logged-out, if the page sits behind any kind of account system
- Geography, if pricing or service availability differs by region
Resist the urge to personalize everything. Two or three meaningful segments, done well, will outperform a page trying to branch six different ways — both because it’s easier to maintain and because you’ll actually have enough traffic per segment to know if it’s working.
Step 2: Set Up Elementor’s Native Display Conditions
Elementor Pro includes built-in Display Conditions you can apply to any section, container, or widget without a plugin. Select the element, go to Advanced → Display Conditions, and click Add Condition. You’ll choose from condition categories including User, Date & Time, Archive, and Browser, each with its own operators (is, is not, contains, and so on).
A simple, practical example: to show a “Welcome back” message only to visitors who are logged in, set the condition to User → User Information → User ID → is not empty. The element only renders for visitors matching that rule; everyone else simply doesn’t see it, no flash of unwanted content.
Native Display Conditions cover a solid baseline, but for the segments that matter most on ad-driven landing pages — URL parameters and traffic source specifically — you’ll need to extend this with a visibility addon.
Step 3: Add URL-Parameter and Geolocation Targeting
This is where most of the real personalization power for landing pages lives. A visibility plugin built for Elementor (several are available, built specifically to plug into Elementor’s existing condition UI) adds condition types for:
- URL parameters — show a different hero section depending on the query string in the link, so a ?campaign=enterprise link and a ?campaign=startup link can land on the same page with different messaging
- Geolocation — show region-specific pricing, currency, or service availability
- Referrer — detect whether the visitor arrived from Google, a specific ad platform, or a partner site
- Custom field values (ACF) — combine with Advanced Custom Fields for more complex personalization logic, like showing different content based on a visitor’s saved preferences
These conditions plug directly into the same Display Conditions panel you used in Step 2, so the workflow stays consistent — you’re just extending the available condition types.

Step 4: Build Your Content Variants
For each segment identified in Step 1, build the corresponding content block — usually a headline, subheadline, and sometimes a hero image or CTA button — as separate elements stacked on top of each other in the same position on the page, each with its own Display Condition attached. Only one variant renders per visitor, based on which condition matches.
A practical structure for a two-segment page (paid traffic vs. organic):
├── Heading A — "Custom Elementor Websites for Enterprise Teams"
│ Display Condition: URL Parameter "campaign" equals "enterprise-ads"
├── Heading B — "Professional WordPress Development for Growing Businesses"
│ Display Condition: URL Parameter "campaign" is not "enterprise-ads" (or is empty)
Keep the surrounding layout — spacing, button placement, supporting imagery — identical across variants. The goal is swapping messaging, not rebuilding the page structure for each segment, which keeps maintenance manageable as you add more variants later.
Step 5: Use Elementor AI to Generate Variant Copy Faster
Writing three or four genuinely different headline-and-subheadline combinations for the same offer is the part of this process that eats the most time. Elementor AI, built into the editor, can generate copy variations directly inside the Heading or Text widget — select the widget, open the AI icon, and prompt it with something like “write 4 headline variations for a WordPress agency landing page targeting enterprise clients arriving from a Google Ads campaign about custom Elementor development.”
Treat the AI output as a first draft, not a final answer. Review every variant for accuracy and tone before publishing — generic AI phrasing is easy to spot, and a landing page is exactly the wrong place for copy that reads as templated rather than specific to the offer.
Step 6: Pull Dynamic Data Where It Adds Real Value
Beyond conditional visibility, Elementor’s Dynamic Tags let you pull live data into a page instead of hardcoding it. Practical uses on a landing page:
- Pricing pulled from a custom field, so updating the price once updates it everywhere the tag is used, rather than hunting through multiple pages
- A countdown timer for a limited-time offer, tied to an actual end date rather than a static “48 hours left” that never changes
- Testimonials pulled from a custom post type, so adding a new testimonial to your site automatically makes it eligible to appear on the landing page without editing the page itself
Access Dynamic Tags through the small cylinder-stack icon next to any compatible field — text, image source, link — and select the data source you want to bind to that field.
Step 7: Test Each Variant Independently
Before launching, test the page by visiting it with each URL parameter combination, from a different browser session or incognito window to avoid your own conditions caching. Confirm:
- Each variant actually renders for its intended condition and doesn’t leak through to the wrong segment
- Fallback content displays correctly for visitors who don’t match any condition, so nobody sees a blank space
- Page load speed hasn’t degraded — stacking multiple hidden variants on a page adds some markup even when only one is visible, so keep hidden variants lightweight
Common Mistakes to Avoid
- Personalizing without enough traffic to justify it. If a segment gets a handful of visits a month, you won’t get meaningful signal on whether the personalized version is actually helping.
- Forgetting fallback content. Every conditional element needs a default state for visitors who don’t match any of your defined segments — otherwise you risk an empty section for a chunk of your traffic.
- Over-relying on AI-generated copy without editing. Publishing AI output directly, without a human pass for accuracy and specificity, tends to produce landing pages that all start sounding the same across the internet.
- Personalizing structure instead of just messaging. Swapping entire layouts per segment multiplies your maintenance burden. Swapping headlines, subheadlines, and CTAs while keeping the underlying layout constant is far easier to manage long-term.
- Not accounting for caching. If your site uses a caching plugin, conditional content based on URL parameters or user state can get cached incorrectly for the wrong visitor. Confirm your caching plugin excludes dynamic/personalized pages from full-page caching, or use fragment caching where supported.
Why This Matters More for Tier-1 and Enterprise Clients
Larger clients typically run multiple simultaneous campaigns — different ad platforms, different target industries, sometimes different regions — all pointing at variations of the same core offer. Building a genuinely dynamic landing page means one well-built, well-tested page can serve all of those campaigns with tailored messaging, instead of a sprawling set of near-identical static pages that all need separate updates every time pricing or positioning changes.
Final Thoughts - Dynamic AI-Assisted WordPress Landing Pages in Elementor Pro
Dynamic, personalized landing pages used to require custom development and a dedicated CRO team. Elementor Pro’s Display Conditions, combined with a visibility addon for URL and geolocation targeting and Elementor AI for faster copy iteration, brings that capability within reach of a standard WordPress build — no custom backend required.
Want a dynamic landing page built for your next campaign — properly segmented, tested, and set up for easy updates? Talk to Dynamic Tech World about your next project, or see recent examples on our portfolio page.
Frequently Asked Questions
Can Elementor Pro build personalized landing pages without custom code?
Yes. Elementor Pro’s native Display Conditions handle user, date, archive, and browser-based personalization out of the box. For URL parameter or geolocation-based personalization, a visibility addon extends the same condition panel without requiring custom development.
What’s the difference between dynamic content and personalization in Elementor?
Dynamic content refers to pulling live data into a page automatically, like a price from a custom field or a testimonial from a custom post type. Personalization refers to showing or hiding entire sections based on who’s viewing the page, using Display Conditions.
Does Elementor support URL parameter-based personalization for ad campaigns?
Native Elementor doesn’t include URL parameter conditions out of the box, but several visibility addons built specifically for Elementor add this capability, letting different ad campaigns land on the same page with tailored messaging based on the query string.
Is Elementor AI useful for landing page copywriting?
It’s useful for generating first-draft headline and copy variations quickly, particularly when you need several versions for different audience segments. AI-generated copy should always be reviewed and edited by a human before publishing to avoid generic-sounding messaging.
Will personalized landing pages slow down my site?
Not significantly if built correctly. Keep hidden content variants lightweight, and make sure your caching plugin properly handles pages with conditional or URL-parameter-based content so cached versions don’t serve the wrong variant to visitors.
How many personalized segments should a landing page have?
Two to three meaningful, high-traffic segments is a practical starting point. Adding more segments than your traffic volume can meaningfully support makes it difficult to tell whether the personalization is actually improving conversion rates.
Written by Abhay Pathak, Founder of Dynamic Tech World, an ISO 9001:2015 certified web development agency based in New Delhi specializing in conversion-focused WordPress and Elementor builds.

Abhay Pathak
Founder, Dynamic Tech WorldAs a full-stack web developer and AI orchestration specialist based in New Delhi, I help creators and agencies scale their digital assets through automated systems, high-speed development, and advanced prompt engineering.
Launch Your Site
Claim up to 20% OFF Premium Web Hosting + a FREE Domain. Fast & Secure.
Claim DiscountJoin the VIP Club
Get free Elementor Pro updates, premium AI prompts, and daily tech hacks directly on our Telegram.
Join TelegramWork With Us
Need a high-converting website, custom AI workflow, or want to advertise your brand to our global audience?
Contact Agency